The idea of a windows to go setup for Windows 8 is very interesting and I have wanted to try this as soon as I hear about it. After doing some research and testing I have managed to get a working copy of Windows To Go to work on a 32GB USB drive.
Now I have seen that this is not the fastest thing in the world, but this is because of some simple reasons. The drive I am using is only USB 2.0 not USB 3.0 making it rather slow, as well as the drive is just not that great to start with. I still really like to use the device and it is a lot of fun to use when you’re at someones house and you want to browse or do work but you do not want to use their computer.
You will need the following.
How to setup the drive.
- From a command prompt
- Run:
diskpart
- At the DISKPART> prompt find your USB drive by typing:
list disk
- Select your USB drive by typing:
select disk 2 (if your drive is listed as drive 2)
- Prep the drive by typing:
clean
- Now we create a partition:
create partition primary
- The partition needs to be formatted and set as bootable:
format fs=ntfs quick
- Set the drive letter for the partition:
assign letter=W
- Set the partition as active:
active
- Exit diskpart:
exit
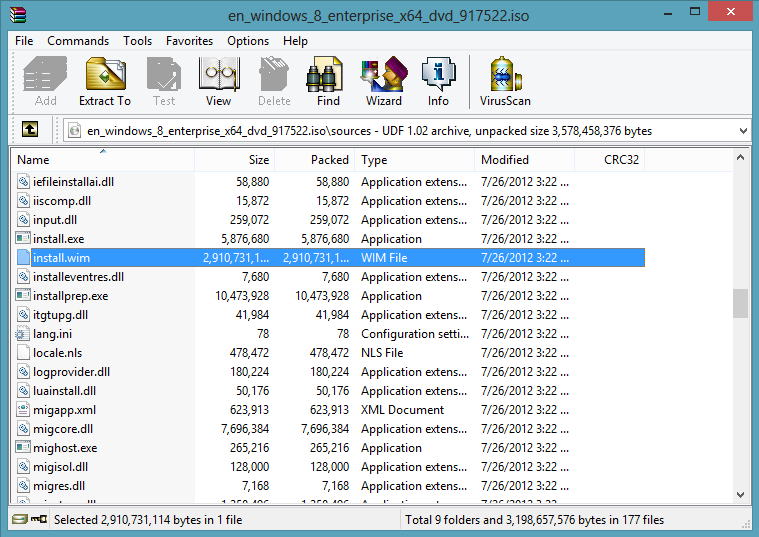
You will now need to get a file off the Windows 8 DVD ISO and a copy of imagex.exe. To access the files in the ISO I recommend using winrar as it can open ISO files. The file you need is called install.wim and it is located in the sources folder in the ISO, copy this file to your local hard drive I recommend the C:\temp\ as it is simple to access from the command prompt.

Windows 8 ISO, install.wim location
You will also need to get a copy of imagex.exe. This is not a simple file to find, you can use Windows AIK but I do not like to download such a large file for a tiny program. I found this great tool called Waik Tools, this will download only the parts that you need. After you have imagex.exe copy it to the same location as your install.wim file.
We can now install Windows on to the drive, to do this run the following command. (change drive letters and paths to what you have set your self)
imagex.exe /apply c:\temp\install.wim 1 W:
After this has run you need to create to boot records on the drive, run the following command.
bcdboot.exe W:\windows /s W: /f ALL
The drive will work properly at this point but it still needs two more changes to make it shine. You will need to apply a SAN policy to take the internal drives offline preventing any changes to the internal drives. This is done by creating a file called san_policy.xml and placing it in the root of the drive with the following contents.
<?xml version='1.0' encoding='utf-8' standalone='yes'?>
<unattend xmlns="urn:schemas-microsoft-com:unattend">
 <settings pass="offlineServicing">
 <component
 xmlns:wcm="http://schemas.microsoft.com/WMIConfig/2002/State"
 xmlns:xsi="http://www.w3.org/2001/XMLSchema-instance"
 language="neutral"
 name="Microsoft-Windows-PartitionManager"
 processorArchitecture="x86"
 publicKeyToken="31bf3856ad364e35"
 versionScope="nonSxS"
 >
 <SanPolicy>4</SanPolicy>
 </component>
 <component
 xmlns:wcm="http://schemas.microsoft.com/WMIConfig/2002/State"
 xmlns:xsi="http://www.w3.org/2001/XMLSchema-instance"
 language="neutral"
 name="Microsoft-Windows-PartitionManager"
 processorArchitecture="amd64"
 publicKeyToken="31bf3856ad364e35"
 versionScope="nonSxS"
 >
 <SanPolicy>4</SanPolicy>
 </component>
 </settings>
</unattend>
After you have placed this file in the root of the drive run this command: (this command only works on Windows 8)
dism.exe /Image:W:\ /Apply-Unattend:W:\san_policy.xml
You will now want to create an answers file that will disable the Windows Recover Enviroment for the drive. Create a file called unattended.xml with the following contents.
<?xml version="1.0" encoding="utf-8"?>
<unattend xmlns="urn:schemas-microsoft-com:unattend">
 <settings pass="oobeSystem">
 <component name="Microsoft-Windows-WinRE-RecoveryAgent"
 processorArchitecture="x86"
 publicKeyToken="31bf3856ad364e35" language="neutral"
 versionScope="nonSxS"
 xmlns:wcm="http://schemas.microsoft.com/WMIConfig/2002/State"
 xmlns:xsi="http://www.w3.org/2001/XMLSchema-instance">
 <UninstallWindowsRE>true</UninstallWindowsRE>
 </component>
 <component name="Microsoft-Windows-WinRE-RecoveryAgent"
 processorArchitecture="amd64"
 publicKeyToken="31bf3856ad364e35" language="neutral"
 versionScope="nonSxS"
 xmlns:wcm="http://schemas.microsoft.com/WMIConfig/2002/State"
 xmlns:xsi="http://www.w3.org/2001/XMLSchema-instance">
 <UninstallWindowsRE>true</UninstallWindowsRE>
 </component>
 </settings>
</unattend>
Save this file as unattended.xml to the sysprep folder on the drive. (W:\Windows\System32\sysprep\)
You should now be ready to use your drive. all you need to do now is boot from it. The first time you boot to the drive on a new computer it will take some time to setup but after that it will be a lot faster to boot.

