Category Archives: Scripting

Send Monitoring Alerts To Microsoft Teams

When you have a large monitoring setup you need to know when something important is failing or is just offline. If you have setup Microsoft Teams you can send a message to a channel to let the support team repair the service or device with minimal down time.

I have set this up in Labtech to send alerts to the alerts channel. Labtech has the nice ability to inject data in a powershell script before it is run, but we will be demonstrating the script by running it directly in powershell.

First step is to create a webhook in the MS Teams channel you wish to use. At the time of writing you can only create a webhook from the web version of MS Teams, it will not work in the desktop client.

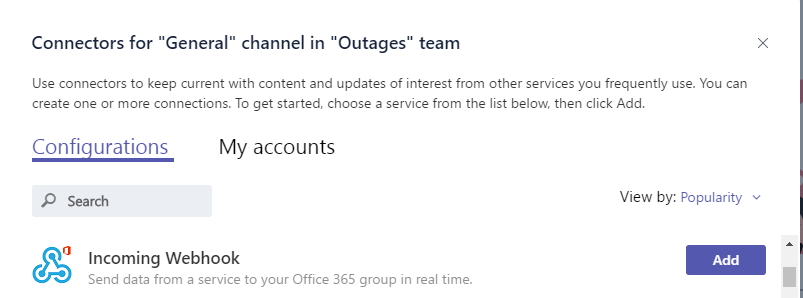
Open the connectors in the channel you want to use for your alerts.

Open the connectors for the channel

Find the “Incoming Webhook” and add it.

Add the Incoming Webhook

Next we need to name the connector and assign an avatar, these settings will change how the sender of the message appears in the channel. I recommend setting the name to the service that will send the messages, and the image to the systems icon or something that is attention grabbing.

Set the name and image the webhook will use when posting.

Once done you will get a url, save a copy of the URL as it is important to the next step.

Copy the Webhook URL for your connector

The next step is to copy the following script, you can also download it from here https://github.com/nightred/MSTeams/blob/master/send-msteams-alert.ps1.

# Powershell MS Teams alert template
#
# This is a template to demonstrate the ability to send notices to
# Microsoft Teams from PowerShell
#
# Parse the command variables
param (
  [string]$message = "This is a test of the alert system",
  [string]$title = "Test Message",
  [string]$status = "Cleared",
  [string]$monitor = "Testing - monitor",
  [string]$location = "Downtown",
  [string]$system = "labsys01"
)
# Edit the URI with the webhook url that was provided
$uri = 'https://outlook.office365.com/webhook/MISSING';
# Build the message Body
$body = ConvertTo-Json -Depth 4 @{
  title = $title
  text = ' '
  sections = @(
    @{
      activityText = $message
    },
    @{
      facts = @(
        @{
          name = 'Status'
          value = $status
        },
        @{
          name = 'System Name'
          value = $system
        },
        @{
          name = 'Monitor'
          value = $monitor
        },
        @{
          name = 'Location'
          value = $location
        }
      )
    }
  )
}
#Send the message to MS Teams
Invoke-RestMethod -uri $uri -Method Post -body $body -ContentType 'application/json';
Write-Output "INFO - Message has been sent.";

You will need to edit the $uri line to have the URL that was provided in the Webhook creation step.
$uri = 'https://outlook.office365.com/webhook/MISSING';

Once done you can execute the script to see the default alert message. To send your own values to the script you can pass variables when run like the following example.
send-msteams-alert.ps1 -message "System is offline" -title "Offline" -status "Critical" -monitor "Offine Check" -location "Downtown" -system "testLab01"

If everything was done correctly you should have a nice message posted to Microsoft Teams like the following.
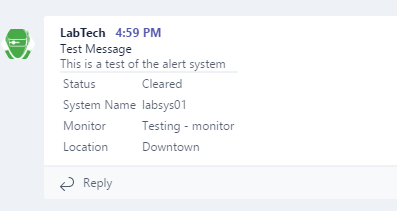
Message sent to Microsoft Teams from a Webhook

Remove Suggested Apps from Windows 10 by Registry

If you need to remove the new suggested applications option from the Windows 10 Start Menu, and you need to push this change to a large install base of managed systems you have a few options.

You can create a GPO to disables the feature if you are managing a domain, or you can modify the registry if you are using a Remote Management Suite to manage several domains and/or workgroups.

Here is the registry value to disable the suggested applications.
[HKEY_LOCAL_MACHINE\SOFTWARE\Policies\Microsoft\Windows\CloudContent]
"DisableWindowsConsumerFeatures"=dword:00000001

This command can be run from an admin command prompt to set the registry setting.
REG ADD HKEY_LOCAL_MACHINE\SOFTWARE\Policies\Microsoft\Windows\CloudContent /v DisableWindowsConsumerFeatures /t REG_DWORD /d 1 /f

Install Ouimeaux on Raspberry Pi

I am working on a custom home automation solution that combines several different systems in a single easy to use control panel. The design is to have a Raspberry Pi 3 B running Ubuntu Mate 16.04 LTS become a hub device that can control all the devices that have automation built in.

The first item on my list is to get my WeMo setup responding to basic commands, to do this we will be installing ouimeaux. The first step is to install the the prerequisites.
sudo apt-get install python-setuptools python-dev python-pip

Next we will run the installer, we will install the server version so that we can use the default web interface and use the REST API in a later project.
sudo pip install ouimeaux[server]

We will need to open a port on the firewall or we will not get any response from any device, I am using ufw. We need to port 54321 for discovery of devices, 5000 for the rest api for the server, and 80 if you will be running the web app.
sudo ufw allow 54321
sudo ufw allow 5000

Now we will want to see if everything is working properly by running the following command to detect and list any devices found.
wemo list

If everything worked properly we should see a list of devices returned like the example below.
Bridge: WeMo Link
Light: lightBedroom
Light: lightHallway

If everything is working properly you can now start the server by running wemo server, if you wanted to keep the server running in the background it would be best to launch with the server with screen or a cron job. you can now open your browser to http://localhost:5000/ to use the page control page provided with Ouimeaux.

Install and configure CJDNS on Ubuntu 14.04

I have wanted to create a way to secure the communicates between the my VPS’s that are located at several geologically different datacenters. Normally each server being it’s own island is not an issue, but this does not work very well if you want the servers to communicate on a secure channel for monitoring and deploying configuration. This type of communication is normally done on an internal network that does not route publicly. Some of the more standard configuration options would be to setup a VPN, or host all the systems in one location on the same subnet. These options are all good but do provide the same interest as setting up CJDNS to route the traffic. Here I will cover how to setup CJDNS to communicate between two freshly installed Ubuntu 14.04 systems.

First we need to install the the prerequisites to build the current version of CJDNS.
sudo apt-get install git build-essential nodejs

Next we will need to download a copy of the project from GIT and run the build.
sudo mkdir -p /opt/cjdns
sudo git clone https://github.com/cjdelisle/cjdns.git /opt/cjdns
cd /opt/cjdns
sudo ./do

CJDNS will use the tun device to communicate, we need to verify that it is working properly.
cat /dev/net/tun
If we see cat: /dev/net/tun: File descriptor in bad state then everything is working properly at this stage.
If we see cat: /dev/net/tun: No such file or directory we will need to create the tun device by running the following commands.
sudo mkdir -p /dev/net
sudo mknod /dev/net/tun c 10 200
sudo chmod 0666 /dev/net/tun
cat /dev/net/tun

If we get the result of cat: /dev/net/tun: Operation not permitted it is likely that your VPS provider has not enabled TUN/TAP device by default. You will need to be activated the TUN/TAP device from the VPS control panel, or by creating a support ticket with your VPS provider.

Next we need to generate the the config file.
sudo mkdir -p /etc/cjdns
sudo chmod 755 /etc/cjdns
./cjdroute --genconf > ~/cjdroute.conf
sudo mv ~/cjdroute.conf /etc/cjdns/cjdroute.conf

Now we need to make some changes to the config file. Open ‘/etc/cjdns/cjdroute.conf’ in an editor and make the following changes.
Find the setting "beacon": 2; and change it to "beacon": 0; to prevent connections to other systems that are broadcasting.
Find the line "your.external.ip.goes.here" in the "authorizedPasswords" section and replace it with your external IP address. In the same section locate the line "peerName":"your-name-goes-here" And change the value "your-name-goes-here" to a human readable name for the system like "CortanaRouter1".

Next copy the connection credentials that we just configured, they should look like this:
"192.168.0.93:7829": {
"login": "default-login",
"password":"9mdh745er8tde3ji927p5nh0",
"publicKey":"6lclpygw4s9m8ksw4k58k5e7haw7b9mpfun1m0.k",
"peerName":"CortanaRouter1"
},

This is an example connection and will not work if used. We will now past this into the "connectTo" section for IPv4 or IPv6 depending on what the system.

We will want to set one of the systems to print the log to the terminal for testing by changing the following settings. First we will set "noBackground":0, to "noBackground":1, and uncommenting the line "logTo":"stdout" in the config. Remember this step is for testing only will will need to be reverted after we have confirmed that the setup is functional.

Now we will want to start the service on the systems by running the following command.
sudo /opt/cjdns/cjdroute < /etc/cjdns/cjdroute.conf

To test if the connection has been setup successfully we will want to ping the IPv6 address assigned to the tun device. The IPv6 address is located at the start of the config file at the setting "ipv6": "fc1b:ddbd:29f1:39fe:95e8:122:4c30:f253",.

Now that we have a CJDNS working we need to setup a proper init script to run on startup, and to control the service. I have modified the init script provided at https://github.com/ProjectMeshnet/CJDNS-init.d-Script/ to work with this guide, you can download it from https://www.jenovarain.com/blog/wp-content/uploads/2016/05/cjdns.txt.

Run the following commands to download and configure the script.
wget https://www.jenovarain.com/blog/wp-content/uploads/2016/05/cjdns.txt
sudo cp cjdns.txt /etc/init.d/cjdns
sudo chmod +x /etc/init.d/cjdns
sudo update-rc.d cjdns defaults

You can now test the new init script by running the following command:
sudo service cjdns status
You should see Cjdns is running if everything is working properly.

You should now have CJDNS setup and configured to start on boot and peered with both system letting you securely route data between the two systems.

We have not covered restricting communication between the systems to only use this new route, and how to segregate peer connections if you connect to other CJDNS peers.

Domain Joins from PowerShell

I have been working in Kaseya a bit and I have had issues with domain joining systems and rejoining systems to domains. I would have even liked to rename systems if I could. After searching and testing many different ideas I have com across PowerShell’s way of domain joining systems.

Help for Add-Computer in Powershell

In Powershell V2 there is a new cmdlet called Add-Computer and it has more power than the GUI version of the domain joining system.
PS C:\> Add-Computer [-DomainName]  [-Credential ] [-OUPath ] [-PassThru] [-Server] [-Unsecure] [-Confirm]
PS C:\> Add-Computer [-WorkGroupName] [-Credential ]

The command below I will be joining the domain “testdom.local” and have already said what account I want to use to do this. This will result in the need to enter a password but that is a simple step. The -passthru switch will give me some basic details about the domain join.
PS C:\> Add-Computer -domainname testdom.local -cred testdom.local\administrator -passthru
You can even specify an Orginization Unit using the switch -OUPath if you did not want to move the system to a different OU after it has been joined to the domain.

The place that this is cmdlet great for anyone running a managed service system like Kaseya is when you can remove a computer from a domain and change the computers name and rejoin the domain. To change a systems name you can use the following command.
PS C:\> Add-Computer -workgroup workgroup -newname testsys01 -force -restart
The switch -Force will suppress the confirmation boxes since the cmdlet Add-Computer asks for confirmation on all commands. The final switch will -Restart will do exactly what it says, it will restart the system after it has run since a restart is often required to make the changes effective.