Social media can be overwhelming with how the larger companies push content, you are being told what to watch and consume. A better social network exists and offers you the choice of what to see and it only shows you what you asked to be in your feeds. Most importantly you can still talk to other accounts on other social media platforms. This is the goal of the Fediverse (https://fediverse.party) to take back control of your social accounts for the giants that keep a closed walled garden. Here we will look at installing Friendica (https://friendi.ca/) on Unraid.
Continue readingManitoba Immunization Card Validation Application Breakdown
The Manitoba Government has built an application to validate immunization cards are valid. The application is very limited in what it is able to do.
On launching the application you will get a logon screen to sign in to your immunizationcard.manitoba.ca account, why you need to sign in only to validate an immunization card is odd as there is no limitations on the usage of the application. To create an account all you need is a Manitoba Health Care Card.
Continue readingDisable Cortana in Windows 10
Windows 10 has been updating the search to only use Cortana, Microsoft’s digital assistant. This assistant might be useful to you and Microsoft has put a lot of time in making Cortana reasonable to use.
Some people would rather have the good old basic search that only shows the programs and the files on your local computer without all the web results and options fro the assistant. Recent updates from Microsoft have change the location of the settings so that you must sign in to Cortana in order to disable options like ‘Show Web Results‘.
There is a way to disable Cortana and change her back to a dumb search box for your system with a few simple edits to the windows registry. Be warned that changing the registry can have major impact on your systems stability if you are not careful.

Send Monitoring Alerts To Microsoft Teams
When you have a large monitoring setup you need to know when something important is failing or is just offline. If you have setup Microsoft Teams you can send a message to a channel to let the support team repair the service or device with minimal down time.
I have set this up in Labtech to send alerts to the alerts channel. Labtech has the nice ability to inject data in a powershell script before it is run, but we will be demonstrating the script by running it directly in powershell.
First step is to create a webhook in the MS Teams channel you wish to use. At the time of writing you can only create a webhook from the web version of MS Teams, it will not work in the desktop client.
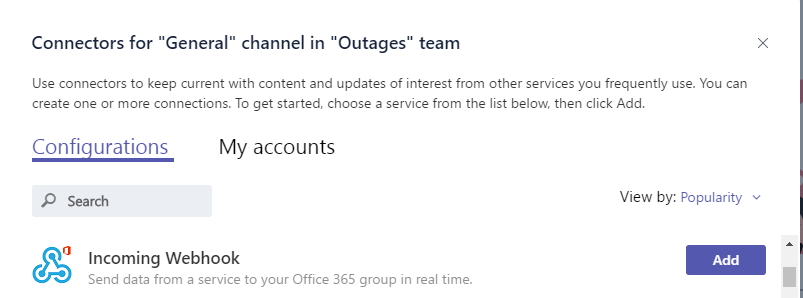
Open the connectors in the channel you want to use for your alerts.
Find the “Incoming Webhook” and add it.
Next we need to name the connector and assign an avatar, these settings will change how the sender of the message appears in the channel. I recommend setting the name to the service that will send the messages, and the image to the systems icon or something that is attention grabbing.
Once done you will get a url, save a copy of the URL as it is important to the next step.
The next step is to copy the following script, you can also download it from here https://github.com/nightred/MSTeams/blob/master/send-msteams-alert.ps1.
# Powershell MS Teams alert template
#
# This is a template to demonstrate the ability to send notices to
# Microsoft Teams from PowerShell
#
# Parse the command variables
param (
  [string]$message = "This is a test of the alert system",
  [string]$title = "Test Message",
  [string]$status = "Cleared",
  [string]$monitor = "Testing - monitor",
  [string]$location = "Downtown",
  [string]$system = "labsys01"
)
# Edit the URI with the webhook url that was provided
$uri = 'https://outlook.office365.com/webhook/MISSING';
# Build the message Body
$body = ConvertTo-Json -Depth 4 @{
  title = $title
  text = ' '
  sections = @(
    @{
      activityText = $message
    },
    @{
      facts = @(
        @{
          name = 'Status'
          value = $status
        },
        @{
          name = 'System Name'
          value = $system
        },
        @{
          name = 'Monitor'
          value = $monitor
        },
        @{
          name = 'Location'
          value = $location
        }
      )
    }
  )
}
#Send the message to MS Teams
Invoke-RestMethod -uri $uri -Method Post -body $body -ContentType 'application/json';
Write-Output "INFO - Message has been sent.";
You will need to edit the $uri line to have the URL that was provided in the Webhook creation step.$uri = 'https://outlook.office365.com/webhook/MISSING';
Once done you can execute the script to see the default alert message. To send your own values to the script you can pass variables when run like the following example.send-msteams-alert.ps1 -message "System is offline" -title "Offline" -status "Critical" -monitor "Offine Check" -location "Downtown" -system "testLab01"
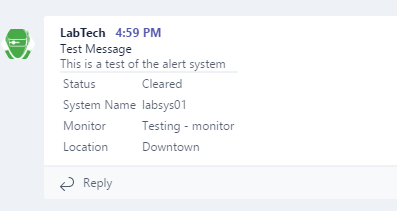
If everything was done correctly you should have a nice message posted to Microsoft Teams like the following.
Remove Suggested Apps from Windows 10 by Registry
If you need to remove the new suggested applications option from the Windows 10 Start Menu, and you need to push this change to a large install base of managed systems you have a few options.
You can create a GPO to disables the feature if you are managing a domain, or you can modify the registry if you are using a Remote Management Suite to manage several domains and/or workgroups.
Here is the registry value to disable the suggested applications.
[HKEY_LOCAL_MACHINE\SOFTWARE\Policies\Microsoft\Windows\CloudContent]

"DisableWindowsConsumerFeatures"=dword:00000001
This command can be run from an admin command prompt to set the registry setting.
REG ADD HKEY_LOCAL_MACHINE\SOFTWARE\Policies\Microsoft\Windows\CloudContent /v DisableWindowsConsumerFeatures /t REG_DWORD /d 1 /f
Install Ouimeaux on Raspberry Pi
I am working on a custom home automation solution that combines several different systems in a single easy to use control panel. The design is to have a Raspberry Pi 3 B running Ubuntu Mate 16.04 LTS become a hub device that can control all the devices that have automation built in.
The first item on my list is to get my WeMo setup responding to basic commands, to do this we will be installing ouimeaux. The first step is to install the the prerequisites.
sudo apt-get install python-setuptools python-dev python-pip
Next we will run the installer, we will install the server version so that we can use the default web interface and use the REST API in a later project.
sudo pip install ouimeaux[server]
We will need to open a port on the firewall or we will not get any response from any device, I am using ufw. We need to port 54321 for discovery of devices, 5000 for the rest api for the server, and 80 if you will be running the web app.
sudo ufw allow 54321

sudo ufw allow 5000
Now we will want to see if everything is working properly by running the following command to detect and list any devices found.
wemo list
If everything worked properly we should see a list of devices returned like the example below.
Bridge: WeMo Link

Light: lightBedroom

Light: lightHallway
If everything is working properly you can now start the server by running wemo server, if you wanted to keep the server running in the background it would be best to launch with the server with screen or a cron job. you can now open your browser to http://localhost:5000/ to use the page control page provided with Ouimeaux.
Install and configure CJDNS on Ubuntu 14.04
I have wanted to create a way to secure the communicates between the my VPS’s that are located at several geologically different datacenters. Normally each server being it’s own island is not an issue, but this does not work very well if you want the servers to communicate on a secure channel for monitoring and deploying configuration. This type of communication is normally done on an internal network that does not route publicly. Some of the more standard configuration options would be to setup a VPN, or host all the systems in one location on the same subnet. These options are all good but do provide the same interest as setting up CJDNS to route the traffic. Here I will cover how to setup CJDNS to communicate between two freshly installed Ubuntu 14.04 systems.
First we need to install the the prerequisites to build the current version of CJDNS.
sudo apt-get install git build-essential nodejs
Next we will need to download a copy of the project from GIT and run the build.
sudo mkdir -p /opt/cjdns

sudo git clone https://github.com/cjdelisle/cjdns.git /opt/cjdns

cd /opt/cjdns

sudo ./do
CJDNS will use the tun device to communicate, we need to verify that it is working properly.
cat /dev/net/tun
If we see cat: /dev/net/tun: File descriptor in bad state then everything is working properly at this stage.
If we see cat: /dev/net/tun: No such file or directory we will need to create the tun device by running the following commands.
sudo mkdir -p /dev/net

sudo mknod /dev/net/tun c 10 200

sudo chmod 0666 /dev/net/tun

cat /dev/net/tun
If we get the result of cat: /dev/net/tun: Operation not permitted it is likely that your VPS provider has not enabled TUN/TAP device by default. You will need to be activated the TUN/TAP device from the VPS control panel, or by creating a support ticket with your VPS provider.
Next we need to generate the the config file.
sudo mkdir -p /etc/cjdns

sudo chmod 755 /etc/cjdns

./cjdroute --genconf > ~/cjdroute.conf

sudo mv ~/cjdroute.conf /etc/cjdns/cjdroute.conf
Now we need to make some changes to the config file. Open ‘/etc/cjdns/cjdroute.conf’ in an editor and make the following changes.
Find the setting "beacon": 2; and change it to "beacon": 0; to prevent connections to other systems that are broadcasting.
Find the line "your.external.ip.goes.here" in the "authorizedPasswords" section and replace it with your external IP address. In the same section locate the line "peerName":"your-name-goes-here" And change the value "your-name-goes-here" to a human readable name for the system like "CortanaRouter1".
Next copy the connection credentials that we just configured, they should look like this:
"192.168.0.93:7829": {

"login": "default-login",

"password":"9mdh745er8tde3ji927p5nh0",

"publicKey":"6lclpygw4s9m8ksw4k58k5e7haw7b9mpfun1m0.k",

"peerName":"CortanaRouter1"

},
This is an example connection and will not work if used. We will now past this into the "connectTo" section for IPv4 or IPv6 depending on what the system.
We will want to set one of the systems to print the log to the terminal for testing by changing the following settings. First we will set "noBackground":0, to "noBackground":1, and uncommenting the line "logTo":"stdout" in the config. Remember this step is for testing only will will need to be reverted after we have confirmed that the setup is functional.
Now we will want to start the service on the systems by running the following command.
sudo /opt/cjdns/cjdroute < /etc/cjdns/cjdroute.conf
To test if the connection has been setup successfully we will want to ping the IPv6 address assigned to the tun device. The IPv6 address is located at the start of the config file at the setting "ipv6": "fc1b:ddbd:29f1:39fe:95e8:122:4c30:f253",.
Now that we have a CJDNS working we need to setup a proper init script to run on startup, and to control the service. I have modified the init script provided at https://github.com/ProjectMeshnet/CJDNS-init.d-Script/ to work with this guide, you can download it from https://www.jenovarain.com/blog/wp-content/uploads/2016/05/cjdns.txt.
Run the following commands to download and configure the script.
wget https://www.jenovarain.com/blog/wp-content/uploads/2016/05/cjdns.txt

sudo cp cjdns.txt /etc/init.d/cjdns

sudo chmod +x /etc/init.d/cjdns

sudo update-rc.d cjdns defaults
You can now test the new init script by running the following command:
sudo service cjdns status
You should see Cjdns is running if everything is working properly.
You should now have CJDNS setup and configured to start on boot and peered with both system letting you securely route data between the two systems.
We have not covered restricting communication between the systems to only use this new route, and how to segregate peer connections if you connect to other CJDNS peers.
Event ID 4319 NetBIOS over TCP/IP with Dual Nic’s
We have received many alerts on the error Event ID 4319 as seen below.
Event log: System

Event Source: NetBT

Event ID: 4319

Message Contents: A duplicate name has been detected on the TCP network.

The IP address of the computer that sent the message is in the data.

Use nbtstat -n in a command window to see which name is in the Conflict state.
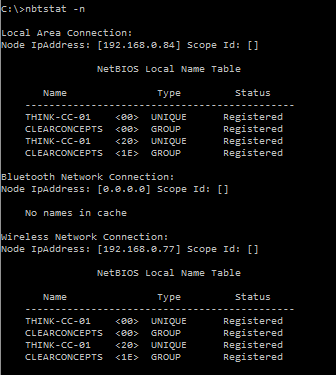
The cause of this issue has been systems that have more than one network card, this is more common in laptops that will use a hardline in the office. you can see this by using the command ‘nbtstat -n’ multiple network cards have the same NetBIOS name.
To correct this behavior you could prevent both network cards from connecting at the same time, although that is not a viable tactic to us. What we have decided to do is disable NetBIOS over TCP/IP on the wireless card. If you are doing this remotely you can run the following commands.
First you will need to know what the index number of your network card is, you can retrieve that with the following command.
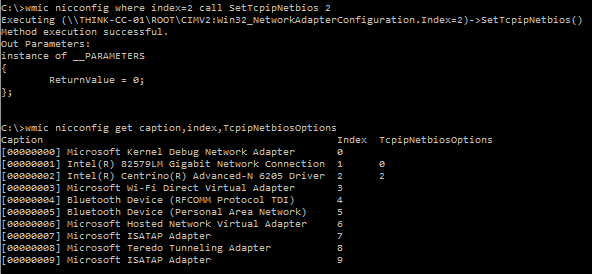
wmic nicconfig get caption,index,TcpipNetbiosOptions
You can see the index number listed next to each network card name, in this case we are looking for the wireless card, that would be index number ‘2’. You can also see the TcpipNetbiosOptions column is showing a ‘0’, that means it is set to DHCP server options or fail over to enabled if DHCP has no options set. we will need the TcpipNetbiosOptions value to be ‘2’ to disable NetBIOS over TCP/IP, and with the index number we can run the following. (Change the index to the nic relevant to your issue.)
wmic nicconfig where index=2 call SetTcpipNetbios 2
The Shape of Tomorrow
One of the ideas that is common to hear is ‘tomorrow will be so different’ and the recently more common ‘this will change everything’. The idea being that the next thing on the horizon will change the world in ways that we could never imagine and that is not going to happen to our civilization without a revolution in technology itself.
Let us consider the example of the horseless carriage, or not since we have beaten that to death. Let us instead look to your home, it is a nice place, it has 4+ walls, a solid flooring, and one would hope a roof over your head. This basic idea has not changed much but our execution of this simple concept can now take us from a dry hole in a hill to any modern dwelling. but we have mastered the building style, tools, and knowledge to make a modern structure. The story of how the food go to your plate is a much better story to show how things change and yet can stay the same, contemplate the supply chain needed to get you that produce on time.
We can see the changes coming that sound big take for example the idea that all stores will have robotic attendants, and all manufacturing is done by machines creating on demand custom handbag to the new kitchen counters. We can imagine this because it is already happening. You only need to look at manufacturing, farming, and distributors to see how they use more advanced tools like robotics to see how this will have a reduction in the need for humans on site.
The shape of the world has is not changed from how it was, we are still going about our daily life handling many small items, doing a task, and interacting with others around us. The idea that things will change beyond our imagining is a farce to help us deal with change in general.
We constantly change but we also adapt and accept the changes. Lets look at something simple like keeping your floor clean, wipe or pickup all the dirt if you do not have a broom or mop the carpet need to be beaten if you do not have a vacuum cleaner. Or jumping forward actually vacyume if you do not have a robotic vacuum. From this simple idea we can see that soon the laundry will be folded for you, the dishes cleaned, and put away.
When you can go down to the local store and pickup a personal attendant for the cost of a small appliance it will be common place. and just like with robotic vacuums nothing will have really changed. We as a species do change more every day and at a faster rate then ever before but your life will not change fundamentally, it will just be improved like it was yesterday.
Job Losses, Basic Income, and EVE.
The modern person works a job to pay the bills and support their way of life and improve it, hopefully by doing something that they enjoy and find rewarding. I would like to ask what happens when you do not have an income and compare this to the MMO Game EVE.
A job is very important to the average person because it pays for the most important things you need like food, and shelter. I do not know anyone that can do without food, and most places are not sunny year round requiring shelter to survive. You might be luck and your parents, partner or to a limited extent governments can provide a limited coverage when you can not support your self. But if government support runs out or parents have issues how do you survive?
If you are luck to find a job you like and you are good at, you should not have many issues providing for yourself. Many people though do not know what they want to do, or have no support to test the waters and get the first job they can. Many articles have been written on the topic of job progression and how once you are in a job that only provides the basics of survival you do not have much ability to progress to better employment, you cannot risk what little you have. To progress you might need to take risks and the risks need to be balanced against what you might gain and what you might loss. If you risk losing your survival you will not take the risk and this would result in becoming trapped and unable to escape.
In most MMO games you do not need to survive in the traditional sense, in EVE you can sit in a space station forever and never pay for rent or food. Now this is not much of an existence but it does something very basic, you can fail at everything in the game and still have a second chance. You can start a company in game, you can explore the universe, you can do literally everything that is offered until you succeed. But the important thing here is that you can and will fail, and that is not a problem in the game world. Because of this safety net you can keep trying and learning from the mistakes and improving until you do something great, and when someone bigger takes it all away you can still try again.
This is where Basic Income would help society grow by giving everyone a guarantee of survival even if they lost everything. We need to provide the basics of food and shelter to all people with no restrictions if we want to encourage people to take the risks to do something great. We normally can not take the same risks we do in games, but if we could build a safety net like Basic Income then we would finally be able take many of the risks in life, imagine what we could accomplish.
If you would like to read more on Basic Income read the Wiki on the topic. http://en.wikipedia.org/wiki/Basic_income
I also recommend keeping up with the reddit community. http://www.reddit.com/r/BasicIncome/


